Cómo hackear la tricotosa electrónica con panel de presión:
Superba S47 – Singer Memo II/600.
(ENGLISH in blue squares)
How to Hack pressure panel knitting machine:
Superba S47 – Singer Memo II/600 (White or Phildar).
No hace mucho tiempo que tengo una tricotosa Superba con panel de presión electrónico, una MemoII. Los que me seguís en este blog y los que me veis en mi canal de YouTube, sabéis que he probado muchas tricotosas tales como Brother, Knitmaster-Empisal-SilverReed y Passap pero nunca me dio por comprar una Singer/Superba.
Después de tener la recomendación de Joaquín, un amigo luthier y artista con unas manos de oro que arreglan todo tipo de máquinas aunque sean de hace dos siglos y junto con mi queridísima amiga tejedora madrileña Lady Violeta, formamos un grupo para compartir entre otras muchas cosas nuestros avances con las tricotosas Singer/Superba. Y así, como los tres mosqueteros, nos lanzamos a intentar resolver cualquier problema que se nos presente en este apasionante mundo del tejido de punto a máquina, así como, compartir conocimientos y disfrutar de nuestra pasión por la tricotosas.
Yo ya había hackeado anterioremente dos tricotosas Brother; una con AYAB y otra con img2track (esta última no es un hackeo en sí, ya que solo se necesita un cable) y realmente con la AYAB había sido fácil debido a que compré la placa necesaria ya soldada y preparada para ser conectada a la tricotosa.
Antes de nada, tengo que agradecer muchísimo a dos miembros de Ravelry: Marianne Svensson de Suecia por su inestimable ayuda y paciencia conmigo hasta que pude configurar correctamente Knitty en mi ordenador y por supuesto, también a Joe Almond, que si no hubiera sido por su ayuda, todavía estaríamos sin poder usar Knitty, él nos ayudó a cambiar una línea de código de Processing para poder solucionar un error que se producía. Os estamos muy agradecidos.
Pero aquí llegaba un nuevo desafío. Después que la máquina pasara por las manos de Joaquín para una puesta a punto y seguidamente tejer unos días con ella. Comprendí que era necesario hackearla y de este modo, eliminar la restricción en cuanto al tamaño de los diseños de los patrones de punto, que en esta tricotosa son 12 puntos por 16 vueltas y viceversa.
En cuanto al tamaño de los diseños se me quedaba pequeña, además cuando probé a hacer Jacquard Doble (con las dos camas de agujas) quedé fascinado debido a que esta tricotosa teje dicho punto con los dos hilos al mismo tiempo, como si se tratara de Jacquard Simple. Mamma Mia!!!, Che Bello!!!.
NOTA IMPORTANTE: ES UN PROCESO DELICADO SOBRE TODO EN LA PARTE ELECTRÓNICA. NO ME RESPONSABILIZO DE LOS DAÑOS Y/O PROBLEMAS QUE PUDIERAS TENER TANTO EN LA PARTE SOFTWARE COMO HARDWARE. TODO EL PROCESO ESTÁ BAJO TU RESPONSABILIDAD.
Y ahora explico cómo hacerlo, seguid leyendo… Au pied de la lettre!:
Not long ago I got a Superba knitting machine with electronic pressure panel, a MemoII. Those of you who follow me on this blog and those of you who watch me on my YouTube channel, know that I have tried many knitting machines such as Brother, Knitmaster-Empisal-SilverReed and Passap but I never got around to buying a Singer/Superba.
After having the recommendation of Joaquín, a luthier friend and artist with golden hands that fix all kinds of machines even if they are two centuries old, and together with my dearest knitting machine friend Lady Violeta from Madrid, we formed a group to share among many other things our advances with Singer/Superba knitting machines. And so, like the three musketeers, we set out to try to solve any problem that might arise in this exciting world of knitwear machine, as well as to share our knowledge and enjoy our passion for knitting machines.
I had already hacked two Brother knitting machines before; one with AYAB and the other with img2track (the latter is not a hack in itself, as only a cable is needed) and actually with the AYAB it had been easy because I bought the necessary board already soldered and ready to be connected to the knitting machine.
First of all, I have to thank very much two members of Ravelry: Marianne Svensson from Sweden for her invaluable help and patience with me until I could configure Knitty correctly on my computer and of course, also Joe Almond from England, who if it had not been for his help, we would still be unable to use Knitty, he helped us to change a line of Processing code to fix an error that occurred. We are very grateful to you.
But here came a new challenge. After the machine had passed through Joaquín’s hands for a tune-up and then I had knitted with it for a few days. I understood that it was necessary to hack it and in this way, eliminate the restriction regarding the size of the designs of the stitch patterns, which in this knitting machine are 12 stitches for 16 rows and vice versa.
As for the size of the designs, it was too small for me, and when I tried to make Double Jacquard (with the two needle beds) I was fascinated because this knitting machine knits this design with both yarns at the same time, as if it were Fair-Isle. Mamma Mia!!!, Che Bello!!!.
IMPORTANT NOTE: IT IS A DELICATE PROCESS ESPECIALLY IN THE ELECTRONIC PART. I AM NOT RESPONSIBLE FOR ANY DAMAGE AND/OR PROBLEMS THAT YOU MAY HAVE IN THE SOFTWARE OR HARDWARE PART. THE WHOLE PROCESS IS UNDER YOUR RESPONSIBILITY.
And now I will explain how to do it, read on… Au pied de la lettre!:
El tutorial funciona sobre un PC con Windows 10/11 y también funciona en Mac.
Enlaces importantes sobre el proyecto Hack Superba+Arduino+Knitty:
https://www.hackerspace-bamberg.de/Singer_Superba
https://www.hackerspace-bamberg.de/Knitty
The tutorial works on Windows 10/11 PCs and also works on Mac.
Important links about the Hack Superba+Arduino+Knitty project:
https://www.hackerspace-bamberg.de/Singer_Superba
https://www.hackerspace-bamberg.de/Knitty
Hay que diferenciar dos partes importantes:
1 La placa ARDUINO y 2 el programa KNITTY.
1.- LA PLACA ARDUINO UNO R3 o ARDUINO NANO:
Este pequeña placa electrónica conocida como Arduino te ayudará a conectar la tricotosa Superba al ordenador.
Te aconsejo que compres la original, ya que hay copias chinas y también otros modelos de placas pero desconozco el funcionamiento con las que no es la original.
– Placa ARDUINO UNO R3 o también funciona con la ARDUINO NANO.
https://store.arduino.cc/products/arduino-uno-rev3
https://store.arduino.cc/products/arduino-nano
(De venta en su tienda oficial, tiendas de electrónica, Amazon, etc).
– Cable USB 2.0 estándar A/B para UNO o Cable Mini-B USB para NANO.
– 4 Cables-puente tipo DuPont macho a macho de unos 40 cm de largo para UNO ó 4 Cables-puente tipo DuPont macho a hembra de unos 20 cm para NANO.
– El programa Arduino IDE v. 1.8.19 para instalar el controlador dentro de la placa Arduino:
https://www.arduino.cc/en/software
– El archivo descargable para instalarlo dentro de la placa Arduino, en este enlace:
https://github.com/knitty/firmware
2.- EL PROGRAMA KNITTY:
Este es un programa que crearon los desarrolladores para controlar la tricotosa con una sencilla interfaz gráfica. Este programa no es un archivo ejecutable directamente. Esta creado en Processing y necesitas descargarte este programa previamente para que funcione dentro de él.
– Programa PROCESSING 2.2.1:
https://processing.org/download
MUY IMPORTANTE: Antes de descargar tu programa, si es para Windows, tienes que averiguar si tu Sistema Operativo Windows es de 32 o 64 bits, mirando en el menú Preferencias/Información de tu Sistema.
Una vez que lo sepas, descarga la versión 2.2.1 correcta para tu ordenador, IMPORTANTE dicha versión, con las últimas posiblemente no te funcionará.
La versión 1.6 de JAVA es la que fue utilizada en el proyecto, NO tienes que instalar Java en tu ordenador, Processing se encarga de ello.
– El programa KNITTY:
https://github.com/knitty/gui
– Dos Librerías:
sDrop v. 0.1.4 https://sojamo.de/libraries/drop/ (Si no te permite descargarlo, prueba desde FireFox).
G4P v. 3.5.4 https://sourceforge.net/projects/g4p/files/?source=navbar
There are two important parts to distinguish:
1. the ARDUINO shield and 2. the KNITTY program.
1.- ARDUINO UNO R3 / ARDUINO NANO SHIELD:
This small electronic shield known as Arduino will help you to connect the Superba/Singer MemoII knitting machine to the computer.
I advise you to buy the original, as there are Chinese copies and also other models of boards but I don’t know how they work with the ones that are not the original.
– ARDUINO UNO R3 Shield or it also works with the ARDUINO NANO.
https://store.arduino.cc/products/arduino-uno-rev3
https://store.arduino.cc/products/arduino-nano
(On sale at your official shop, electronics shops, Amazon, etc.).
– Cable USB 2.0 standard A/B for UNO o Mini-B USB cable for NANO.
– 4 wires/cables type DuPont macho a macho about 40 cm long for UNO or 4 wires/cables type DuPont macho a female about 20 cm for NANO.
– The Arduino IDE v. 1.8.19 program to install the controller inside the Arduino shield:
https://www.arduino.cc/en/software
– The downloadable file to install it inside the Arduino board, in this link:
https://github.com/knitty/firmware
2.- KNITTY PROGRAM:
This is a program created by the developers to control the knitting machine with a simple graphical interface. This program is not an executable file directly. It is created in Processing and you need to download this program previously for it to work inside it.
– PROCESSING 2.2.1 Program:
https://processing.org/download
VERY IMPORTANT: Before downloading your program, if it is for Windows, you have to find out if your Windows Operating System is 32 or 64 bits, by looking in the menu Preferences/System Information.
Once you know this, download the correct version 2.2.1 for your computer.
JAVA version 1.6 is the one that was used in the project, you do NOT have to install Java on your computer, Processing takes care of that.
– KNITTY Program:
https://github.com/knitty/gui
– Two Libraries:
sDrop v. 0.1.4 https://sojamo.de/libraries/drop/ (If you can’t download it, try it from FireFox).
G4P v. 3.5.4 https://sourceforge.net/projects/g4p/files/?source=navbar
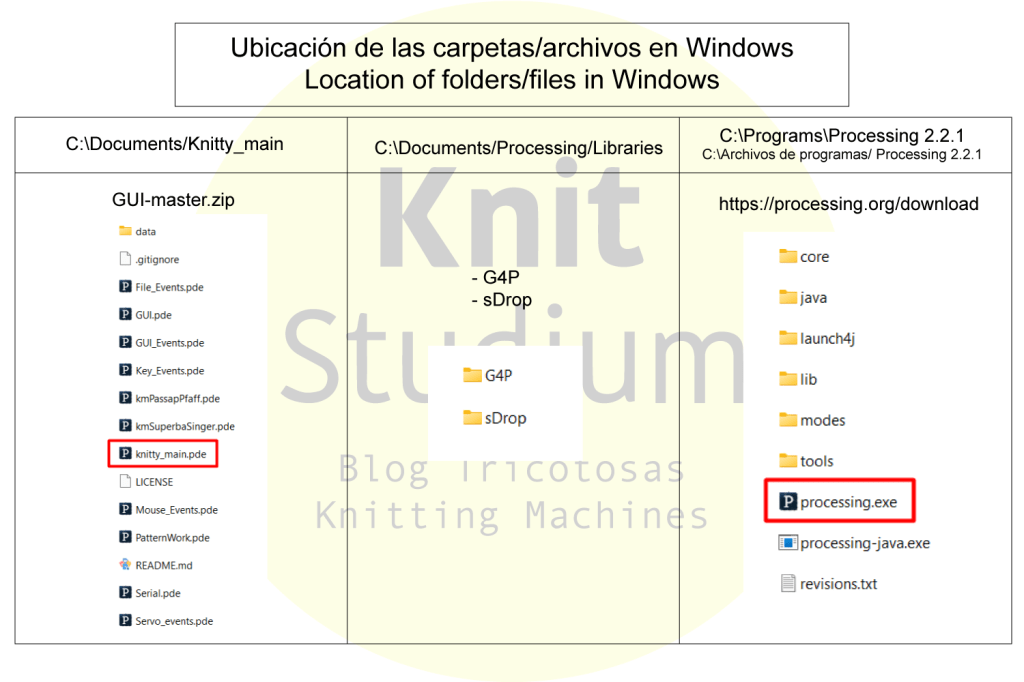
The placement of the Processing and Knitty folders is very important.
Load the driver into the Arduino IDE with the Arduino board connected. Press the «Right Arrow» button and it will download into your board and you are done.
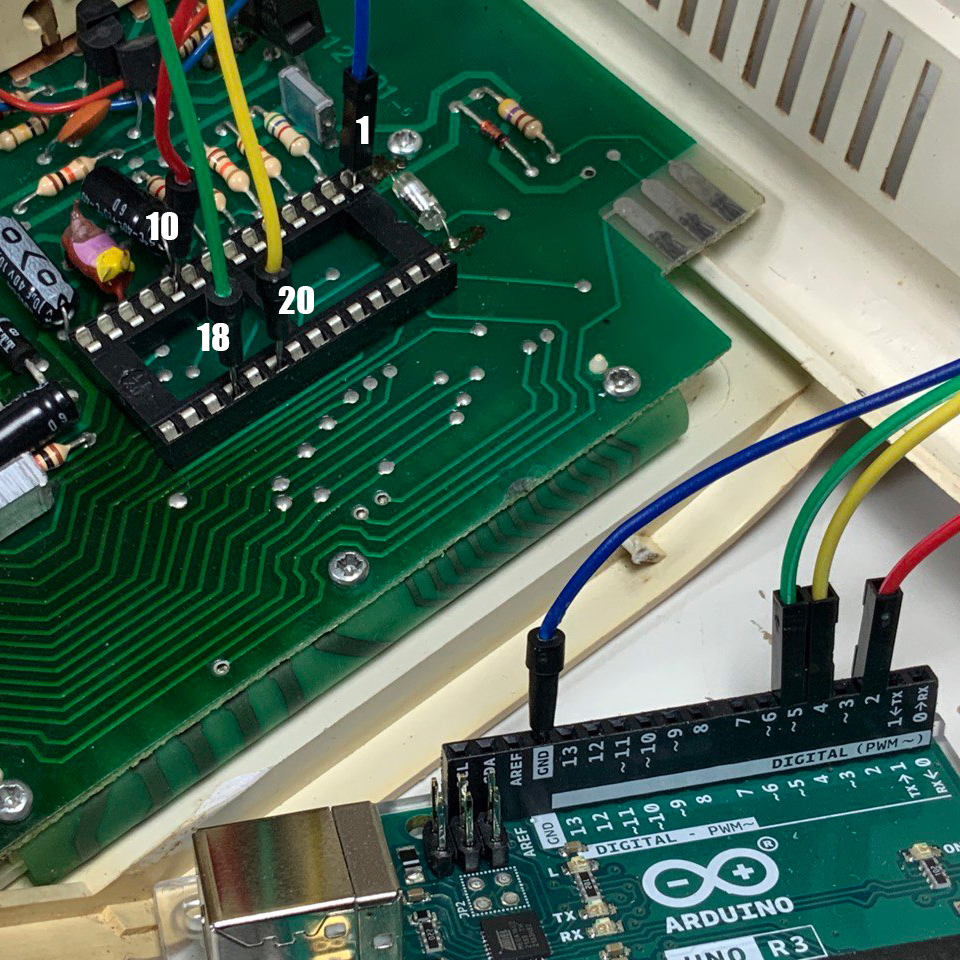
Removing the main chip.

I recommend jumper cables (DuPont type) of at least 40 cm for the ARDUINO UNO shield and 20 cm for the ARDUINO NANO shield.
ARDUINO UNO
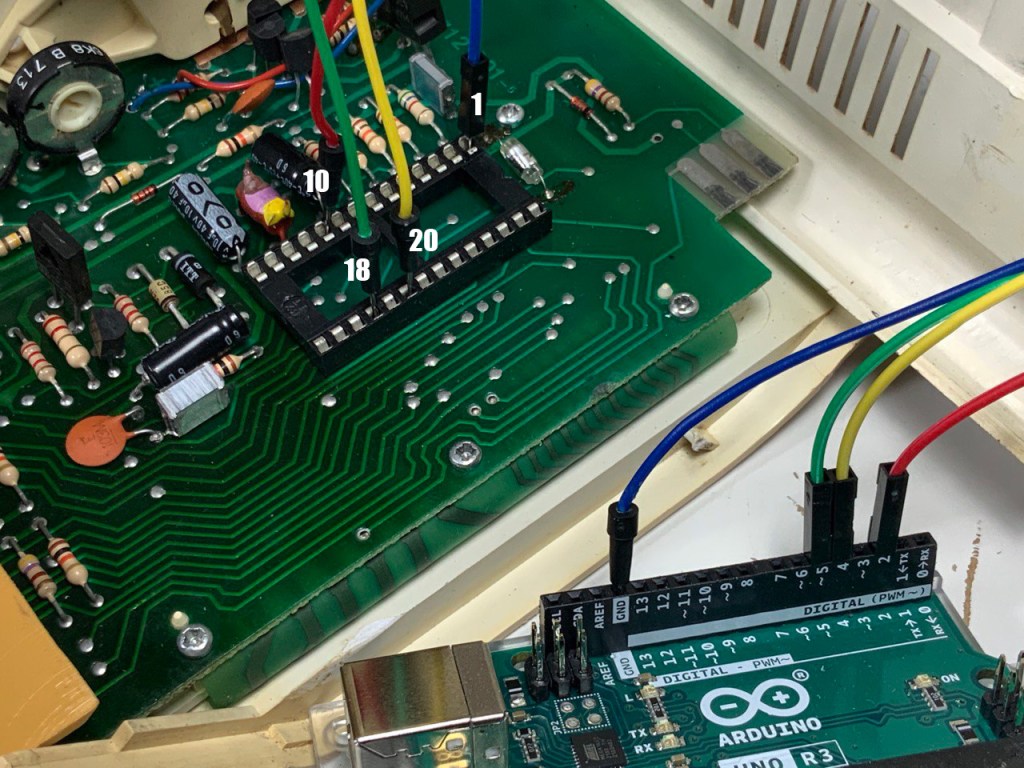
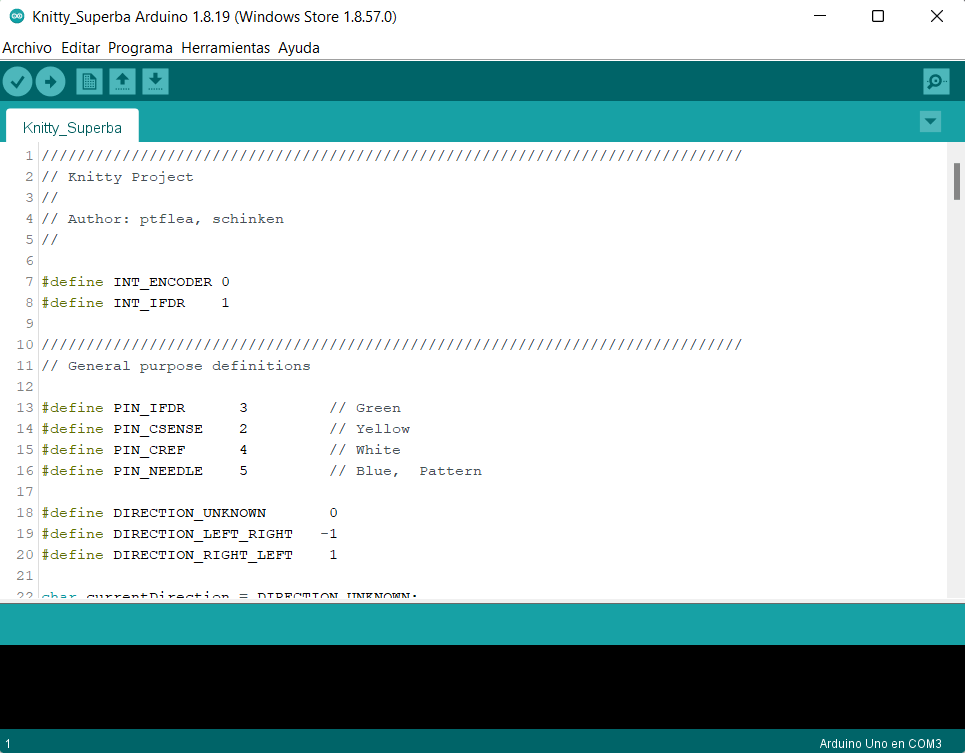
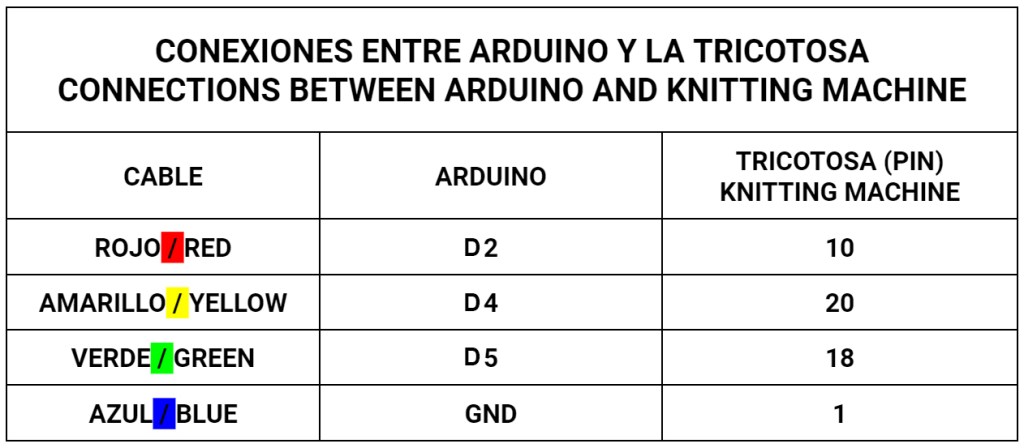
Join these connections with the jumper wires as shown in the picture, between the ARDUINO UNO and the knitting machine chip.
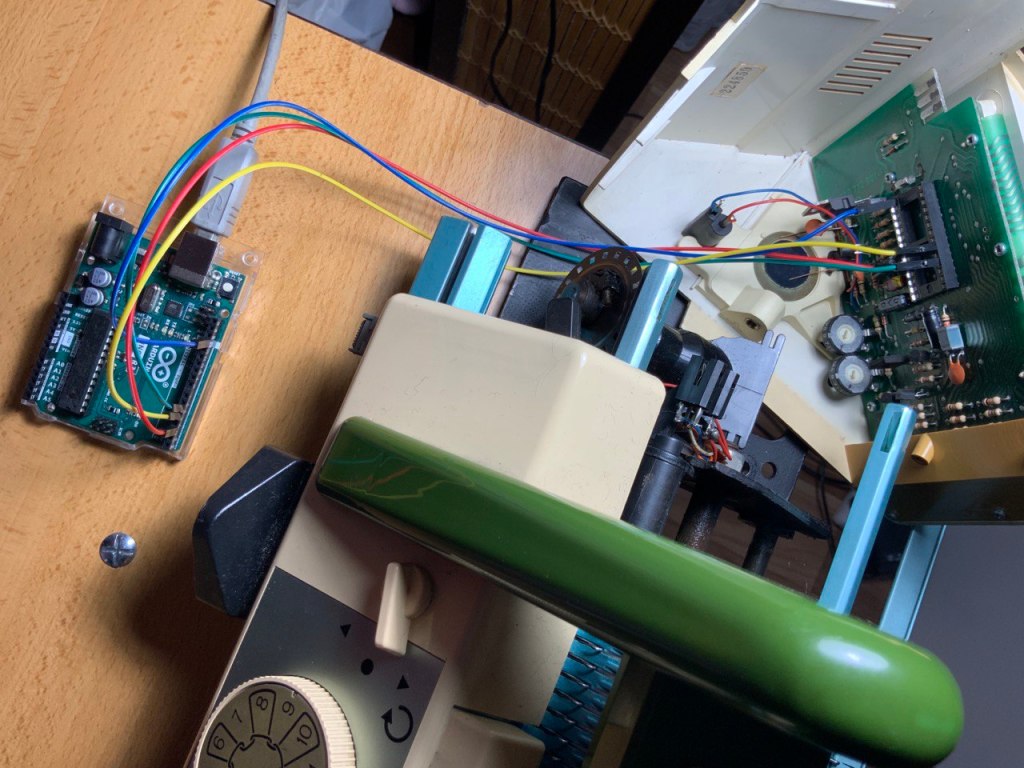
After making the connections to the ARDUINO UNO shield, you have to put the programming panel back in its usual place.
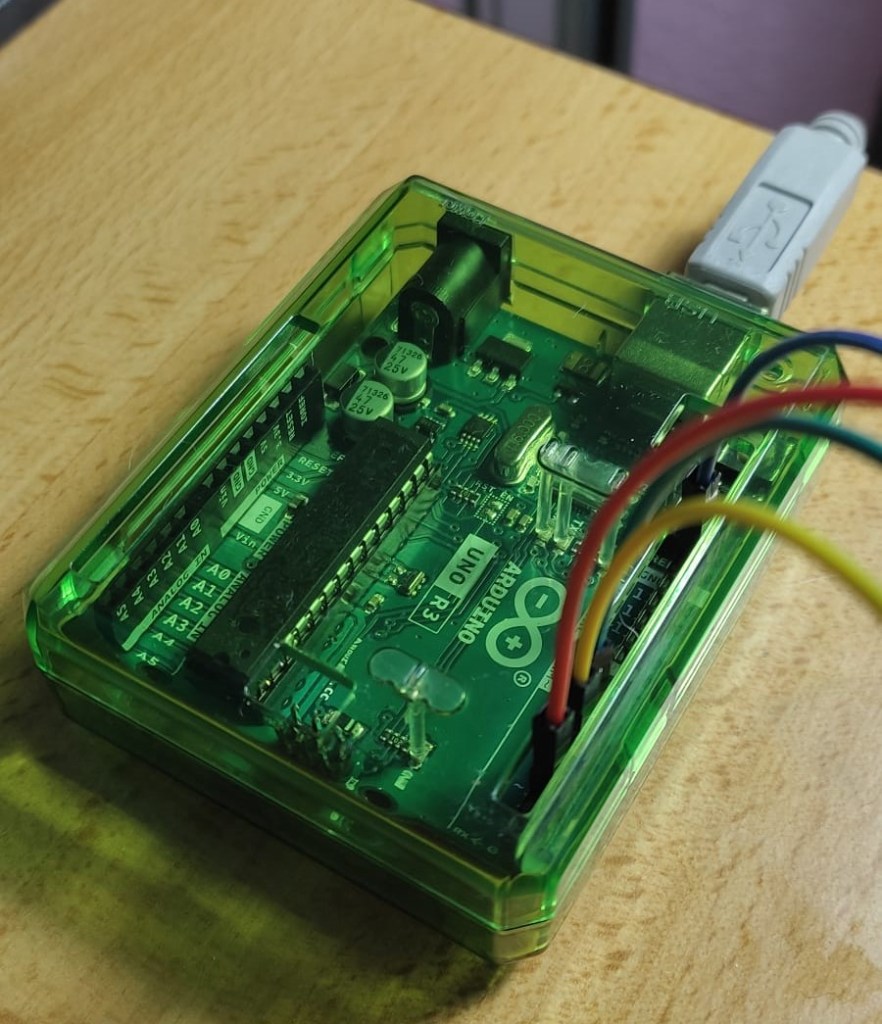
I bought this box to protect my ARDUINO UNO from lint and small fibres that are released when knitting. My idea is to place it underneath the knitting machine table so that it is protected from dirt.
ARDUINO NANO
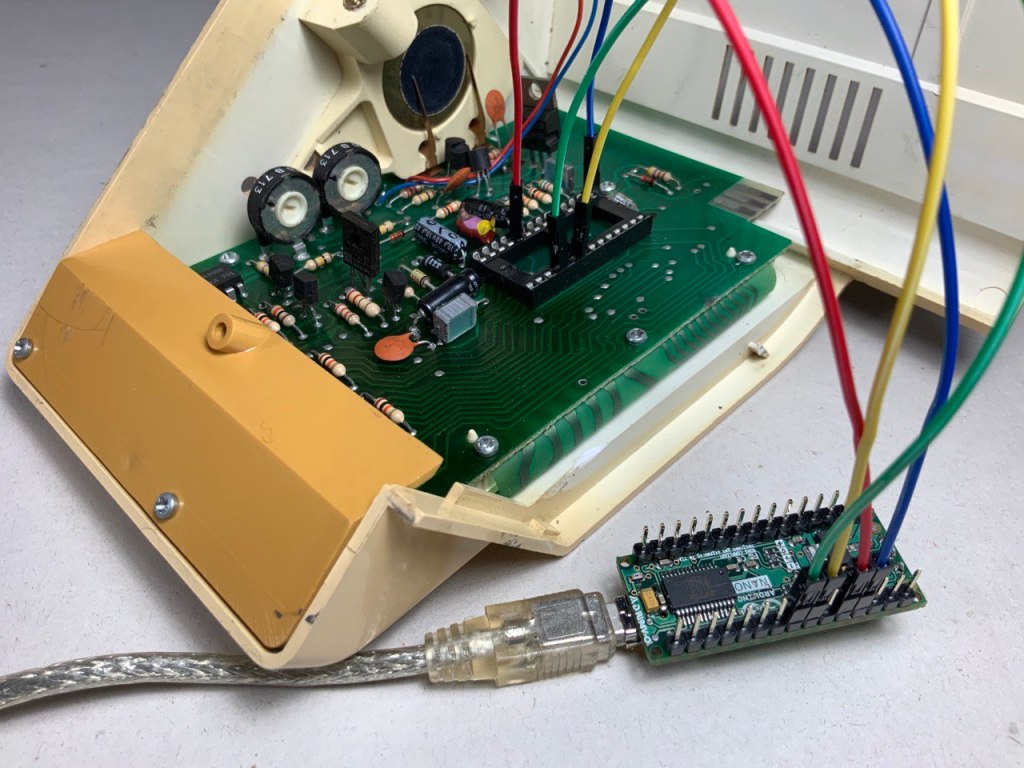
It also works with the ARDUINO NANO shield, the process is the same but the difference is that this shield can be placed inside the programming panel, that is to say, inside the knitting
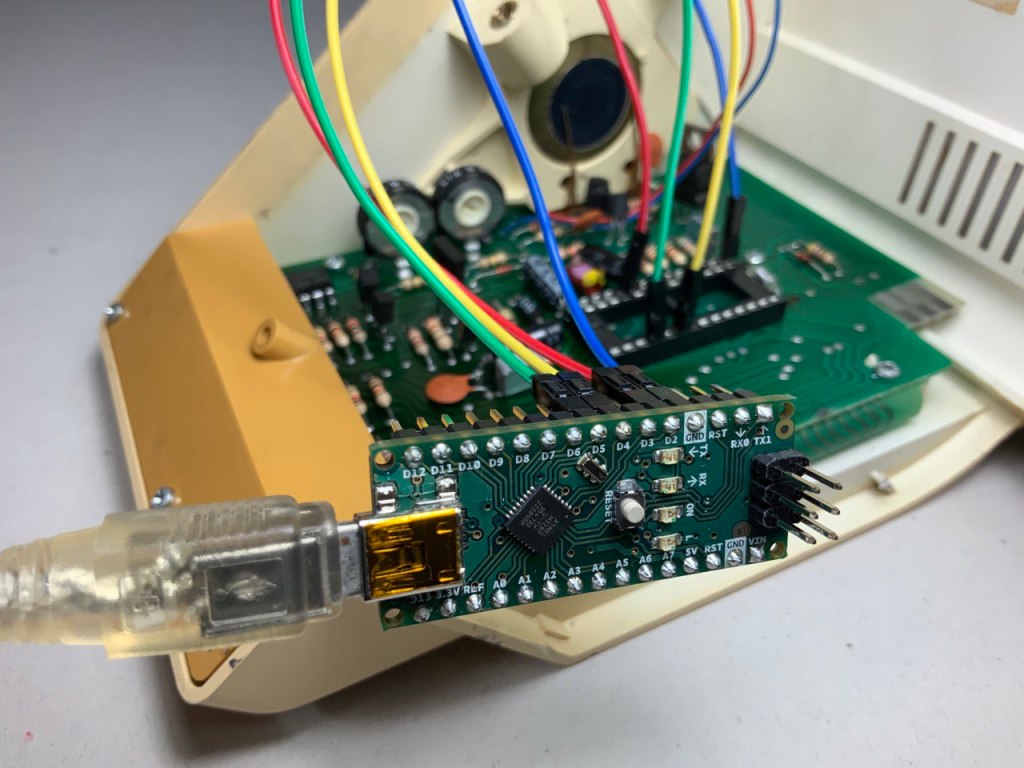
It also works with the ARDUINO NANO shield, the process is the same but the difference is that this shield can be placed inside the programming panel, that is to say, inside the knitting
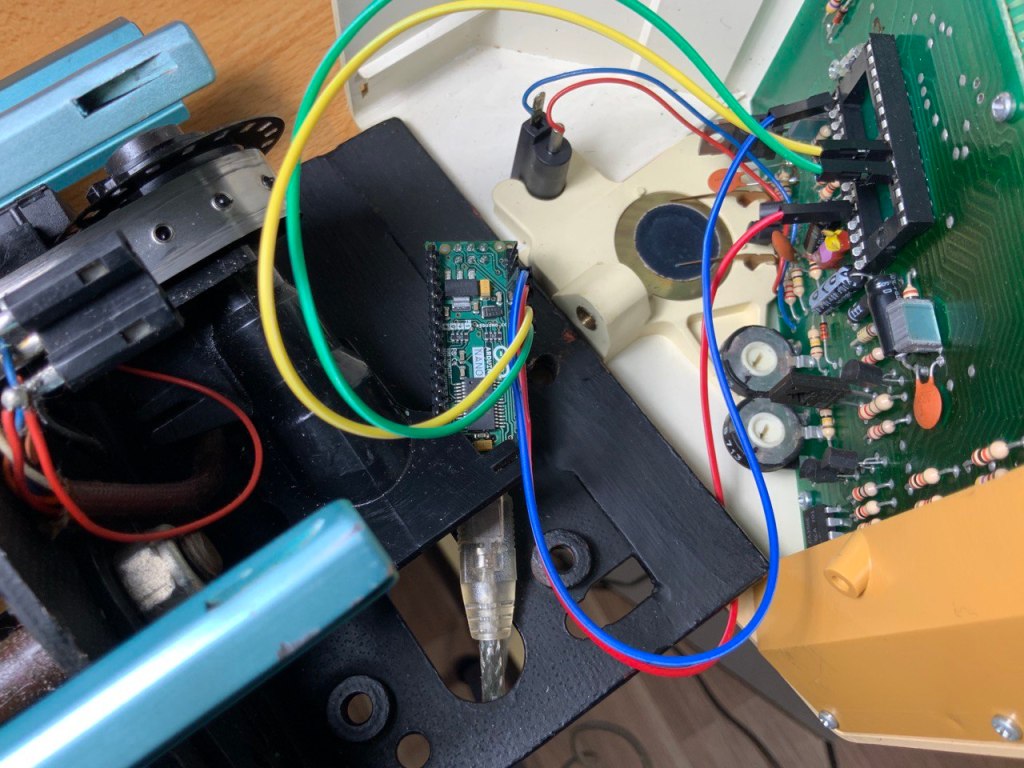
The ARDUINO NANO stays inside the programming panel, the USB cable to the computer comes out from underneath it.
KNITTY
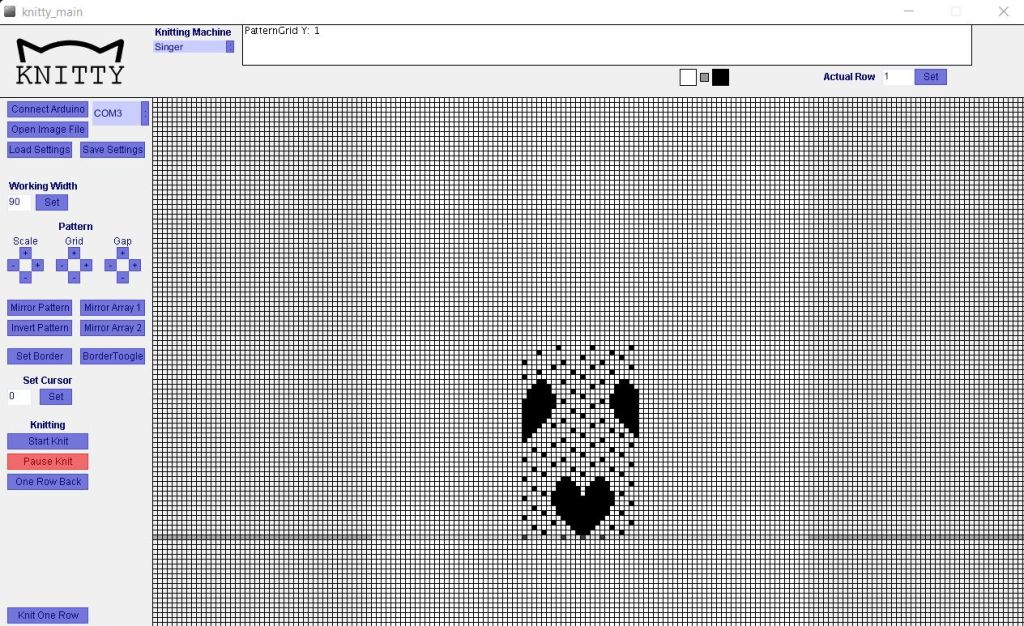
I finally managed to open Knitty!!!
ERROR???
Comprueba si te funciona, a mí, me daba un error cuando usaba el botón en Knitty: «Connect Arduino». Para solucionar este problema, el miembro de Ravelry conocido como Zubynjoe, nos indico que una línea de código había que cambiar para que ya no produzca dicho error. Mil gracias de nuevo Joe por tu ayuda.
Cuando tenemos abierto Knitty en Processing, hay que buscar entre las pestañas un archivo llamado «Serial». Aquí hay que desplazarse hasta la línea de código número 103 o busca la línea y donde pone: [serialport], cambiarlo por un cero: [0]
Recuerda Guardar el archivo pulsando el botón «Flecha hacia abajo: SAVE» y estará listo. Prueba de nuevo si funciona!
Check if it works for you, it gave me an error when I used the button in Knitty: «Connect Arduino». To solve this problem, Joe, told us that a line of code had to be changed so that the error would no longer occur. Thanks again Joe for your help.
When you have Knitty open in Processing, look for a file called «Serial» in the tabs. Here you have to scroll to the line of code number 103 or search the line and where it says: [serialport], change it to a zero: [0].
Remember to save the file by pressing the «Down Arrow: SAVE» button and it will be ready. Try again if it works!
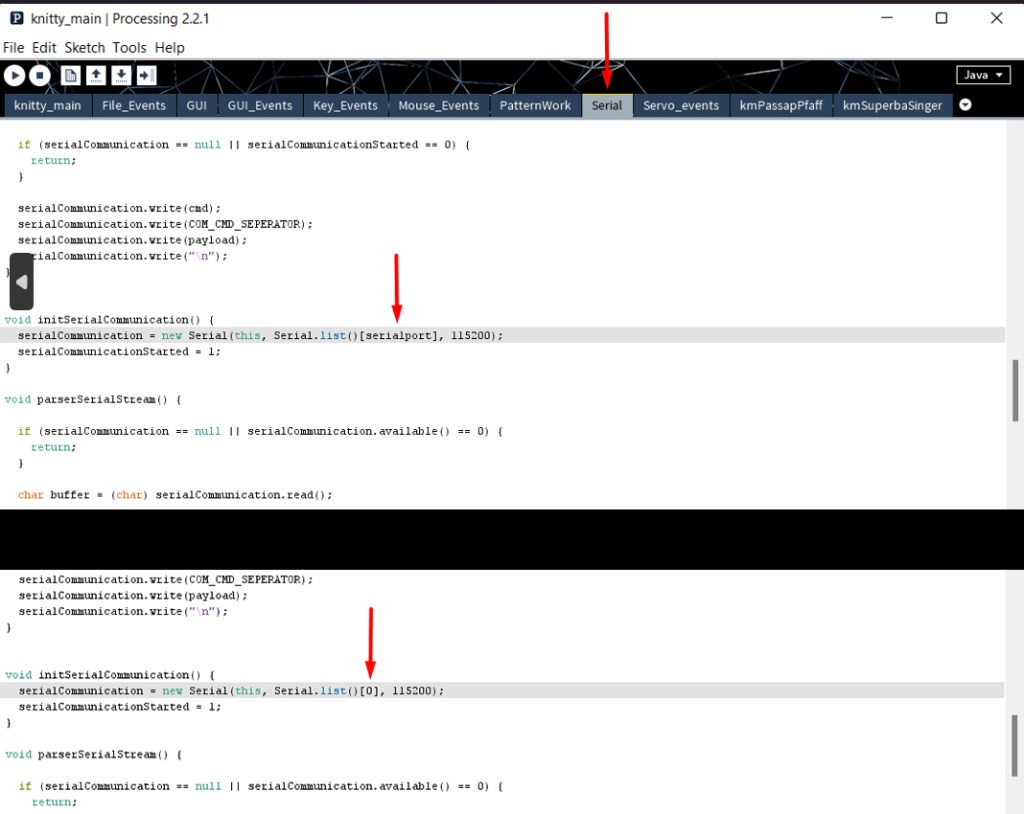
Change «serialport» to «0». Then press the «Down Arrow» button to save.
IMPRESORA DE PUNTO
KNITTING PRINTER
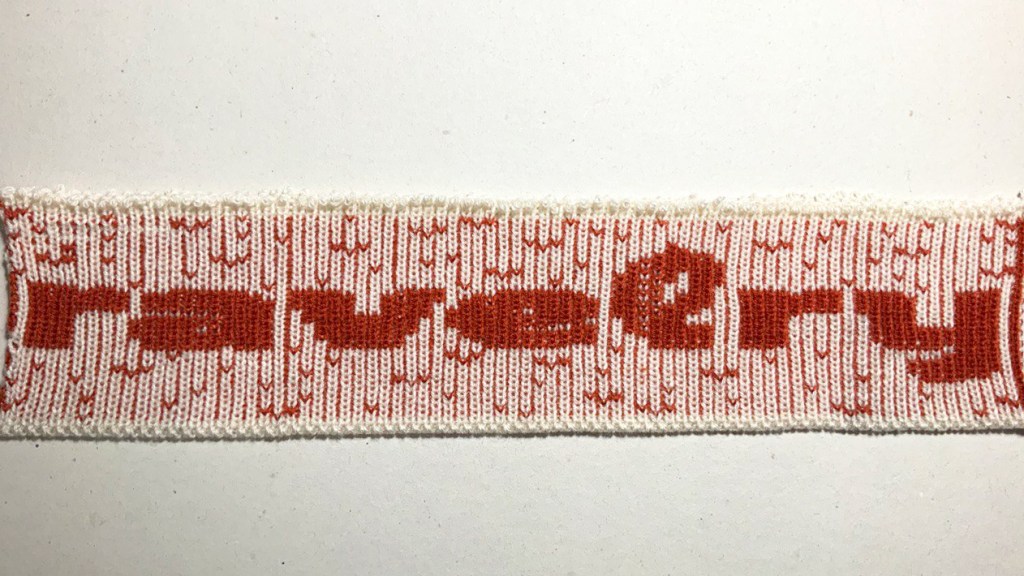
A sample knitted through Knitty!!!!
DISEÑOS DE PUNTO PARA KNITTY
STITCH DESIGNS FOR KNITTY
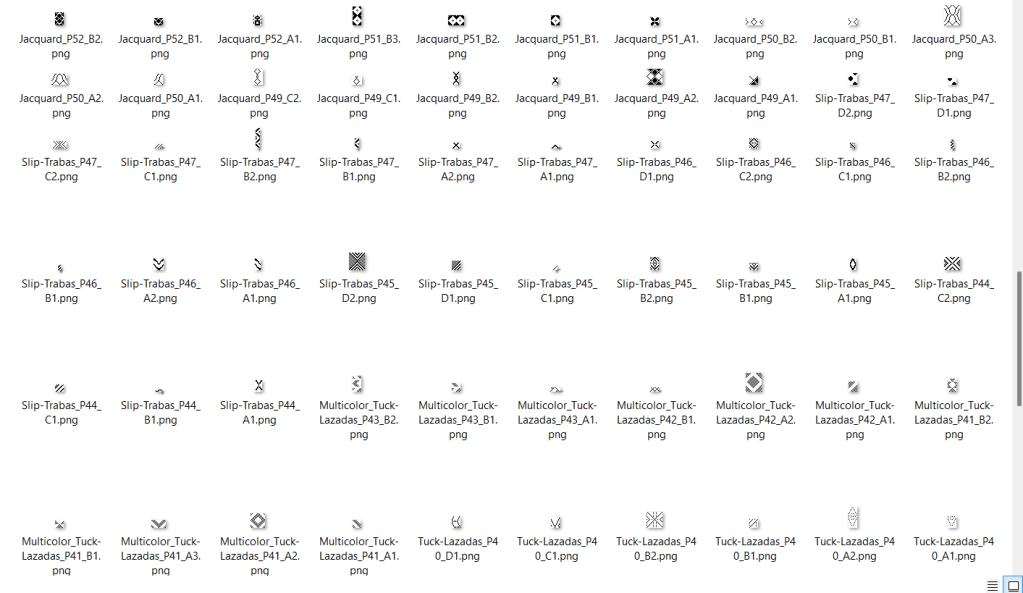
En este enlace tienes todos los diseños de punto que vienen en el Manual de la MemoII, yo los he convertido en versión digital (.PNG) para ser usados en Knitty u otro programa similar.
In this link you have all the stitch patterns that come in the MemoII Manual, I have converted them into a digital version (.PNG) to be used in Knitty or other similar software.
SUPERBA SINGER Stitch Designs Knitty PNG format
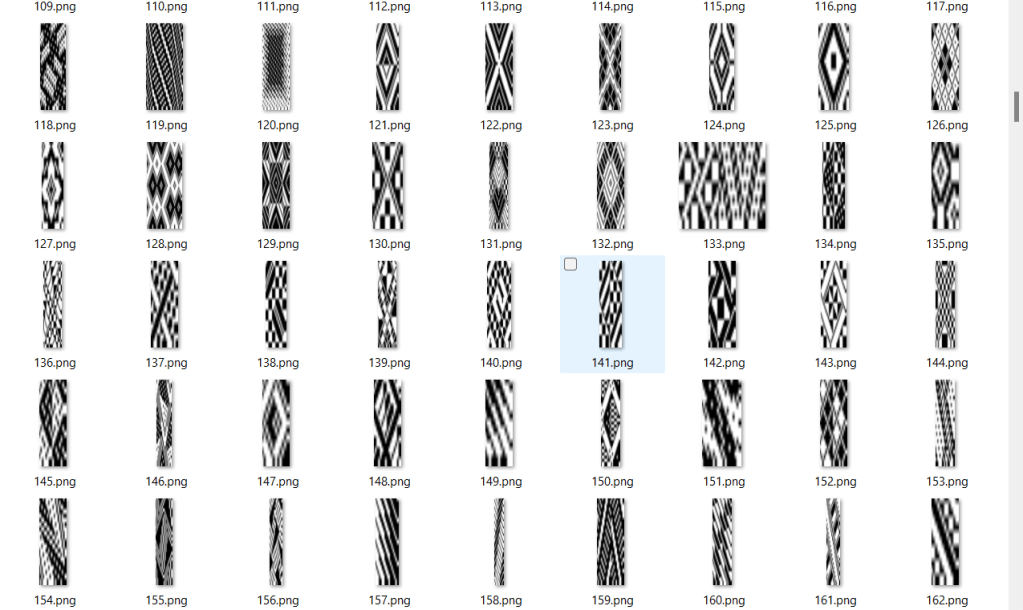
En este enlace tienes todos los diseños de punto que vienen con las tricotosas electrónicas Singer/Superba System 624-9000 en versión digital (PNG) para usar en Knitty u otro programa similar, así como el libro en PDF con todos las fotos de los mismos diseños. Agradezco a Joe Almond su trabajo por compartir los diseños y dedicarse a escanear el libro… ¡Son 900 diseños!!! ¡Todos te lo agradecemos!!!.
In this link you have all the knitting patterns that come with the Singer/Superba System 624-9000 electronic knitting machines in digital version (PNG) to use in Knitty or other similar software, as well as the PDF book with all the photos of the same patterns. I thank Joe Almond for his work in sharing the designs and scanning the book…. That’s 900 designs!!! We all thank you!!!!.
SINGER SUPERBA Stitch Designs System 624-9000 PNG format
Víctor Manuel Gómez / Knitstudium.com / Bilbao, Ba
